Vagrant環境に複数台VMを立ち上げて、ElasticsearchのCluster構成を作ってみたので、メモとして残しておく。
設定
Vagrantfileは以下。
VAGRANTFILE_API_VERSION = "2"

Vagrant.configure(VAGRANTFILE_API_VERSION) do |config|

  # boxファイルは適当に用意する
  config.vm.box = "elasticsearch_cluster"

  config.vm.define :el1 do | el1 |
    el1.vm.network "private_network", ip: "192.168.25.20"
  end

  config.vm.define :el2 do | el2 |
    el2.vm.network "private_network", ip: "192.168.25.30"
  end
end
で、vagrant upをすると、el1とel2の二台のVMが立ち上がる。
それぞれのVMに以下のことを行う。
# Javaのインストール
sudo yum -y install java-1.6.0-openjdk-devel

# iptablesを無効に
sudo chkconfig iptables off
sudo /etc/rc.d/init.d/iptables stop

# Elasticsearchのインストール
curl -O https://download.elasticsearch.org/elasticsearch/elasticsearch/elasticsearch-1.1.1.tar.gz
tar zxvf elasticsearch-1.1.1.tar.gz
cd elasticsearch-1.1.1

# elasticsearch-headプラグインもついでに入れておく
bin/plugin -install mobz/elasticsearch-head
そして次がポイントで、それぞれのelasticsearch.ymlのnetwork.hostを以下のようにeth1を使うようにする。
network.host: '_eth1:ipv4_'
そして各VM内でElasticsearchの起動をする。
bin/elasticsearch
確認
ホストPCから
http://192.168.25.20:9200/_plugin/head/
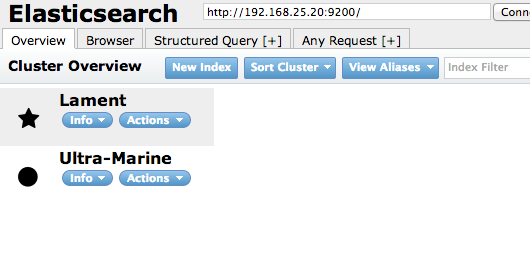
にアクセスするとクラスターとして認識されているのがわかる。

各VMがどうして自動的にクラスター認識できるかというと、
Elasticsearchにはzen discoveryという、クラスターを自動で探索してくれる機能があるため。
※なおzen discoveryには、マルチキャスト(multicast)とユニキャスト(unicast)の2種類あり、
デフォルトはマルチキャスト(multicast)。
http://www.elasticsearch.org/guide/en/elasticsearch/reference/current/modules-discovery-zen.html
本当にクラスター設定がされているか確認するために、
データを登録してみる。
$ curl -XPUT http://192.168.25.20:9200/blog/article/1 -d '{"title": "Elasticsearch Cluster!!", "content": "今日はElasticsearch Clusterの設定をしてみます" }'
{"_index":"blog","_type":"article","_id":"1","_version":1,"created":true}
http://192.168.25.20:9200/_plugin/head/
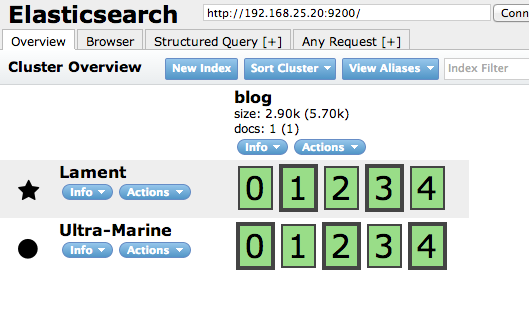
にアクセスするとそれぞれのノードにシャーディングされ、バランスよくプライマリシャードができてることがわかる。

またそれぞれのVMにドキュメントのGETリクエストを投げてみる。
$ curl -XGET http://192.168.25.20:9200/blog/article/1
{"_index":"blog","_type":"article","_id":"1","_version":1,"found":true, "_source" : {"title": "Elasticsearch Cluster!!", "content": "今日はElasticsearch Clusterの設定をしてみます" }}
$ curl -XGET http://192.168.25.30:9200/blog/article/1
{"_index":"blog","_type":"article","_id":"1","_version":1,"found":true, "_source" : {"title": "Elasticsearch Cluster!!", "content": "今日はElasticsearch Clusterの設定をしてみます" }}
192.168.25.20と192.168.25.30のどちらに投げてもドキュメントが取得できていることがわかる。
まとめ
ということで、カジュアルにVagrant環境にElasticsearchのCluster構成が出来ました。
Elasticsearchのことをもっと知りたい方は
「高速スケーラブル検索エンジン ElasticSearch Server」
という書籍が最近でて非常に色々と詳しく書かれているので購入するとよいと思います!

高速スケーラブル検索エンジン ElasticSearch Server
- 作者: Rafal Kuc,Marek Rogozinski,株式会社リクルートテクノロジーズ,大岩達也,大谷純,兼山元太,水戸祐介,守谷純之介
- 出版社/メーカー: KADOKAWA/アスキー・メディアワークス
- 発売日: 2014/03/21
- メディア: 大型本
- この商品を含むブログ (2件) を見る